Save Time Hanging Pictures At Eye Level With Easy-to-Make Picture Hanging Tools
If you’re a gallerist, museum curator, interior designer, art collector, or Do-it-Yourselfer,
And you hang pictures centered at eye level,
My innovative eye-level picture-hanging tools enable you to hang pictures in a fraction of the time of traditional picture-hanging methods.
A Zero-Math Picture Hanging System
There’s nothing like the satisfaction of curating an art exhibit or acquiring new artwork.
However, doing the calculations for hanging pictures at eye level can be tedious.
You know the picture-hanging formula and optimal display height,
Your picture-hanging system is dialed in –
Measure – divide,
Measure – subtract,
Add and calculate…
But with each picture a specific size,
And every hanger at a different height,
It can be a lengthy process.
Now…it’s time to forget the picture-hanging formula and free your mind to curate the art.
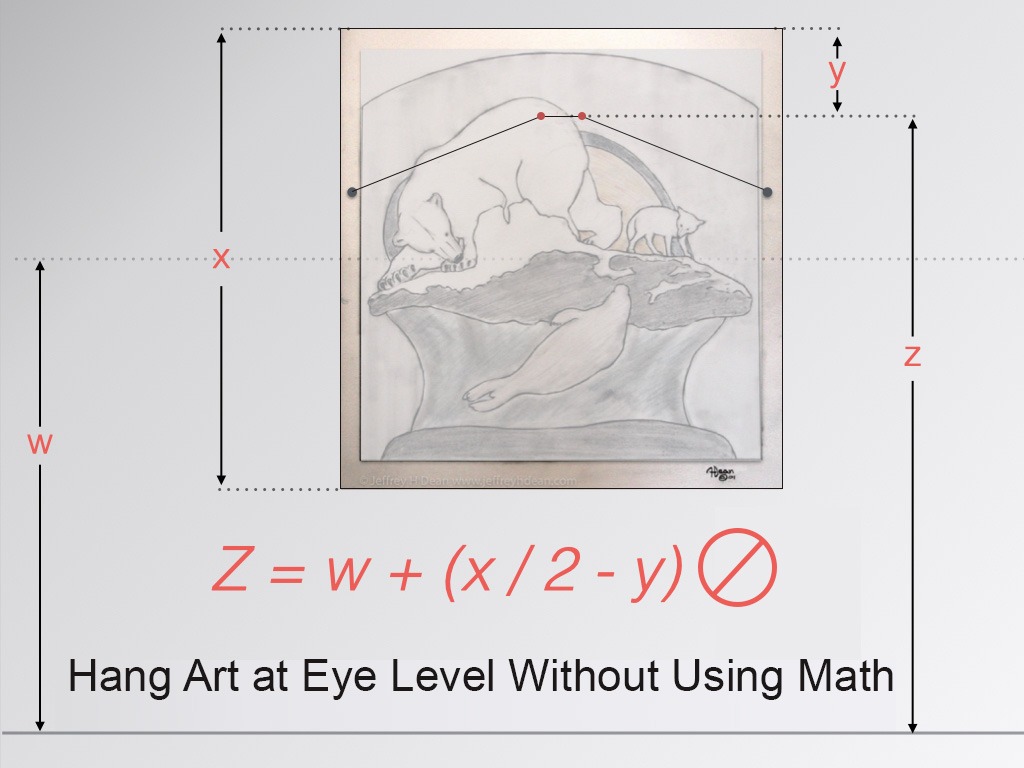
The Ubiquitous Picture Hanging Formula
This diagram illustrates the universal picture hanging formula exhibit technicians use to find the picture hanger height when hanging art centered at eye level.
Written as Z=W+(x/2-y), the equation is solved with the following steps:
Measure the picture frame height (x),
Divide it in half,
Measure and subtract the distance from the hanger to the top of the frame (y),
Add the result to your predetermined eye-level picture-hanging height, typically 57″. (w).
Fasten the hanger to the wall at (z).
I knew there had to be a simpler way…
Creating an Efficient Picture Hanging Solution
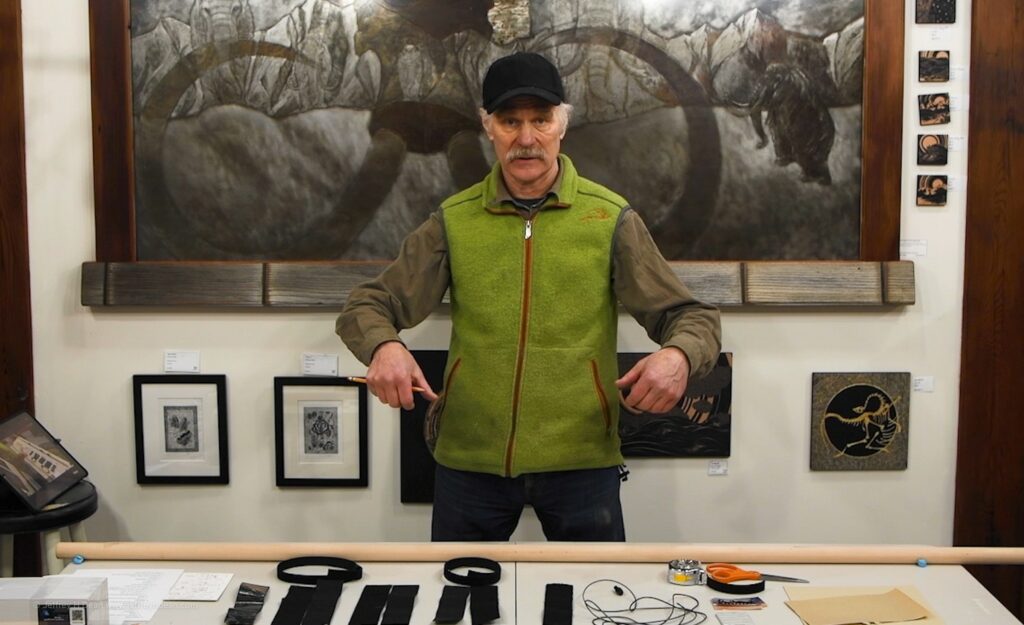
Hello, I’m Jeff Dean. I’m a sculptor and metal artist in Homer, Alaska.
When I was on the visual arts committee for our local arts council in the early ’80s, we hung exhibits with pictures centered at eye level using the picture-hanging formula.
My frustration with the time required to hang each show inspired me to develop a more efficient method.
It’s not that I was lazy or couldn’t do the math.
But I had little patience with the steps and time required to calculate the picture hanger height for each artwork.
Even today, with apps at our fingertips, it’s a time-consuming task.
Not to mention those pesky fractions!
I knew there had to be a more efficient way.
Being hardwired to find solutions for vexing problems, I’ve invented countless ways to make my job easier in my 40 years as a professional sculptor.
So, I set out to develop a tool that solved the picture-hanging formula without using math.
As I lay awake in the early morning hours, I worked out the prototype for my first eye-level picture-hanging tool.
After the proverbial Aha moment and a hasty breakfast, I made my first eye-level picture-hanging tool.
The visual arts committee received it with delight,
And hanging the next show was a breeze.
Needless to say, my trusty Eye Level Gallery Pole has been in use ever since.
Picture this:
You pull out your trusty Gallery Pole, and…
You’ve marked the wall for the picture hanging hardware location in seconds.
All without using a tape measure,
Or adding and subtracting those pesky fractions.
Your show is hung in a fraction of the time you’re used to.
I’ve designed these tools to besurprisingly quick and easy to make using scissors, readily available supplies, and a tape measure (maybe the last time you’ll need one for hanging pictures)
Don’t let their simple concept and ease of construction mislead you.
They are truly elegant tools – solving the picture-hanging formula quickly without math.
They enable you to determine and mark the picture hanger height on the wall in seconds.
I’ll show you exactly how to make and use them in my concise online workshop.
With only a small investment of time to watch the workshop videos and assemble your tool, you’ll have a unique opportunity to use a time-saving tool unknown to the masses.
‘For lack of a better description, I found this hanging device to be magical.’
Todd Sherman – Professor of Art, Emeritus University of Alaska Fairbanks
That’s right!
You’ll be able to go from looking at rows of curated pictures along the gallery wall to a ready-to-open show in a fraction of the time required using traditional picture-hanging methods.
When you use one of my time-saving devices,
You eliminate having to measure each picture frame and the relative location of its cable or cleat.
You bypass using math and the picture-hanging formula to calculate the picture-hanger height for each artwork.
Finally, you’ll wonder, ‘Dang! Why didn’t I think of that?
Ready to streamline your picture-hanging system and make hanging your next exhibit a breeze?
Introducing:
Make Your Own Eye-Level Picture Hanging Tools
A Concise On-Demand Video Workshop
Go through my easy-to-follow video tutorial and save time hanging pictures at eye level.
These easy to assemble tools are a pleasure to use.
14-day Money Back Guarantee
GET INSTANT ACCESS FOR JUST $47 USD
How do they these Eye-Level Picture Hanging Tools work?
Both the Gallery Pole and the pocket tool are based on simple mechanical concepts.
I’ve refined them over many iterations to make them easy to assemble using simple tools and readily available supplies.
These innovative devices are streamlined, ‘Dang! Why didn’t I think of that?’ ideas.
The Gallery Pole bypasses the gallery math altogether. Instead, it measures the picture frame while centering the measurement around the calibrated eye-level height.
Then, when you position the hanger height marker, it is directly related to the established eye level and ready to transfer to the wall.
Or, if you’re batch-processing art prior to installing an exhibition, you can note the picture-hanger height on the back of each picture, ready for the exhibit installation technicians.
The Pocket Gallery Assistant works a little differently. It uses a hands-on approach to determine the hanger height by solving the picture-hanging formula directly without using numbers.
The video below demonstrates how quickly you can determine the picture-hanger height with the Gallery Pole.
In this case, the picture is lying flat on a padded surface. It works equally well with the picture rotated and leaning against a wall or work stand or held by an assistant.
Inside the Make Your Own Eye-Level Picture Hanging Tools Workshop
In each video lesson, I’ll take you step by step through the process to show you exactly how to make and use the Gallery Pole and Pocket Gallery Assistant tools.
Introduction
I explain the advantages and benefits of each tool so you can decide which you prefer
and show you how to use them in various situations
Resource List
You’ll have a complete resource list of the simple tools and materials you’ll need
Demonstration
I take you step-by-step through preparing your materials, assembling each component, and putting them together ready for use.
Calibration & Use
You’ll learn how to easily calibrate them for different gallery hanging heights
Make Your Own Eye-Level Picture Hanging Tools
Easy to Assemble – A Pleasure to Use
$
47 USD
Simple Concept
Easy to Make Using Familiar Materials
A Pleasure to Use
100% MONEY-BACK GUARANTEE
Worried about not having the skills to make these tools?
The Good News is:
If you are handy with scissors, can read a tape measure, and follow well-narrated step-by-step video demonstrations, you’re in for a treat.
If you are short of time, maybe you have an assistant, a handy teenager, or a trusty neighbor to call upon.
Plus… if you’re worried about going it alone,
I’ve got you covered.
You have access to the integral Q&A Channel on the workshop platform, where you can get answers to any questions you may have.
'For lack of a better description, I found this hanging device to be magical.'
"In the late 1980's and early 1990's I was the Gallery Coordinator for the Fairbanks Arts Association. My duties included installing their
monthly exhibits at the Bear Gallery in the Fairbanks Civic Center and supervising a small volunteer staff to hang these shows. It is the largest gallery in Interior Alaska.
Given that we had, on average, 5 days to take down one exhibit and install the upcoming exhibit I found the unique tool that Jeff Dean
had created to be extremely useful.
For lack of a better description, I found this hanging device to be magical. It was fairly simple to use and cut the hanging process of these exhibits by half or even less. It is truly a time-saving device. I am excited to hear that Jeff is creating
a new and improved version. If I were still a gallery coordinator I would absolutely invest in this new tool."
Todd Sherman
Professor of Art, Emeritus University of Alaska Fairbanks
Make Your Own Eye-Level Picture Hanging Tools
Easy to Assemble – A Pleasure to Use
$
47 USD
Simple Concept
Easy to Make Using Familiar Materials
A Pleasure to Use
100% MONEY-BACK GUARANTEE
Our 100% money-back guarantee covers you.
We want you to be satisfied with your purchase, but we also want you to take action and put your best effort into applying the workshop content.
However, if you are unsatisfied with the workshop, you can request a refund. Describe your reason for not continuing with your request.
That said, please skip this offer if you do not intend to take action.
'For lack of a better description, I found this hanging device to be magical.'
"In the late 1980s and early 1990s I was the Gallery Coordinator for the Fairbanks Arts Association. My duties included installing their
monthly exhibits at the Bear Gallery in the Fairbanks Civic Center and supervising a small volunteer staff to hang these shows. It is the largest gallery in Interior Alaska.
Given that we had, on average, 5 days to take down one exhibit and install the upcoming exhibit I found the unique tool that Jeff Dean
had created to be extremely useful.
For lack of a better description, I found this hanging device to be magical. It was fairly simple to use and cut the hanging process of these exhibits by half or even less. It is truly a time-saving device. I am excited to hear that Jeff is creating
a new and improved version. If I were still a gallery coordinator I would absolutely invest in this new tool."
'The device does away with the need to calculate the hanging height for every artwork, which adds convenience and can speed the hanging process.
"Fairbanks Arts manages the Bear Gallery, which has hosted exhibitions for the Fairbanks community for going on 60 years. Bringing these shows to fruition requires hundreds of staff and volunteer hours each year. We have used the pole for over a decade as a way to facilitate volunteer assistance in hanging exhibitions. The device does away with the need to calculate the hanging height for every artwork, which adds convenience and can speed the hanging process."
'I certainly wish I'd found it two years ago.'
"When I took this position, I found myself overwhelmed by the time consuming process of hanging artwork traditionally, with tape measurer and calculator. I have since devised a system that works very well, but It was apparent after working with the Eye-Level Gallery Pole for a short time that it was very easy, quick, and intuitive to use. I compared previously hung artwork where I had used traditional methods and found the accuracy of the Eye-Level Gallery Pole to be satisfyingly comparable but required much less effort. I certainly wish I'd found it two years ago."
So Where Has it Been All These Years?
A quick internet search reveals many picture-hanging hacks and an equal number of picture-hanging tools and tips to make hanging pictures on walls easier.
One gallery owner created an online painting height calculator to make it easier to solve the picture hanging formula. And, if you’re new to picture hanging, his blog has an excellent picture hanging guide covering all aspects of how to hang pictures on walls.
But, I’ve yet to find a gallery hanging system that eliminates the need for a tape measure and calculator when centering pictures at an eye-level picture hanging height.
I’ll be the first to say I feel remiss for not sharing the Gallery Pole with the art world 40 years ago.
I took steps to do so, with a provisional patent and an honorable mention in the Arctic Innovation Competition, but my art career took priority.
To my surprise, as I lay awake practicing my presentation for the competition, a rogue idea popped into my head about how I could accomplish the same thing with a pocket-sized tool.
Though I left that out of my presentation, I’m excited to finally have a way to share both of these tools with you and the art world at large.
'The device does away with the need to calculate the hanging height for every artwork, which adds convenience and can speed the hanging process.
"Fairbanks Arts manages the Bear Gallery, which has hosted exhibitions for the Fairbanks community for going on 60 years. Bringing these shows to fruition requires hundreds of staff and volunteer hours each year. We have used the pole for over a decade as a way to facilitate volunteer assistance in hanging exhibitions. The device does away with the need to calculate the hanging height for every artwork, which adds convenience and can speed the hanging process."
Jess Peña
Executive Director - Fairbanks Arts Association
Hang Your Pictures at Eye Level Without Using Math
Whether you hang artwork alone or with a team, my picture hanging tools will streamline your system of hanging pictures, freeing more time for other tasks.
Their concept is simple, solving the picture-hanging formula quickly without math.
They enable you to determine and mark the picture hanger height on the wall in seconds.
They are surprisingly quick and easy to assemble using scissors, readily available supplies, and a tape measure (maybe the last time you’ll need one for hanging pictures : )
I show you exactly how to make and use them in my concise online workshop.
Don’t let their simple concept and ease of construction mislead you. They are truly elegant tools.
And you may be thinking, why do I need something new? I have an efficient system in place. But, with a small investment of time, you’ll be able to assess whether these tools will be useful for you.
And with the 14-day money-back guarantee, you can do so knowing you have nothing to lose.
Get instant access and learn to make and use these innovative tools.
100% MONEY-BACK GUARANTEE
We want you to be satisfied with your purchase, and we also want you to give your best effort to apply the workshop content. Therefore, we offer a 14-day refund period for purchases. Follow this link for the details: Refund Policy.
'I certainly wish I'd found it two years ago.'
"When I took this position, I found myself overwhelmed by the time consuming process of hanging artwork traditionally, with tape measurer and calculator. I have since devised a system that works very well, but It was apparent after working with the Eye-Level Gallery Pole for a short time that it was very easy, quick and intuitive to use. I compared previously hung artwork where I had used traditional methods and found the accuracy of the Eye-Level Gallery Pole to be satisfyingly comparable but required much less effort. I certainly wish I'd found it two years ago."
Chase Warren
Museum Exhibits Manager
If you’re wondering what the best tools for hanging pictures are, it depends on the task at hand.
But, if you hang pictures centered at the typical gallery or museum hanging height, then my eye-level picture-hanging tools may become the most valuable picture hanging solutions in your toolkit for speeding up your gallery hanging system.
PS. : ) As an artist and gallery owner, I have to add that if you’re looking for original metal wall art or sculpture, be sure to take a look at my online gallery and commissions page or visit us at The Dean Gallery here in Homer, Alaska.